RIMS system (Recirculating Infusion Mash System)
The equipment, complete with Arduino
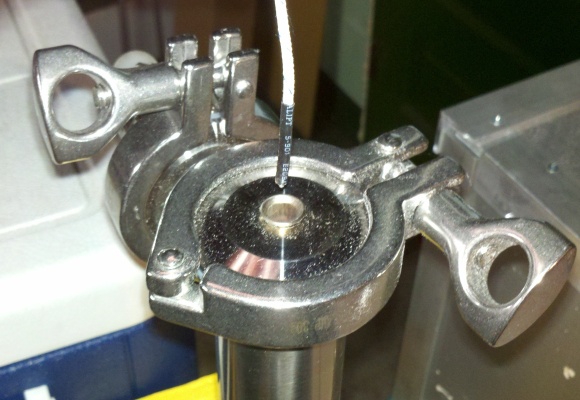
*RIMS tube disassembled

![]() The RIMS tube is welded from 1.5" stainless tubing with
tri-clover fittings. A thread for a standard water heater element is at bottom and a thermowell
tube at top.
(www.brewershardware.com) This guy does beautiful work in stainless steel
The RIMS tube is welded from 1.5" stainless tubing with
tri-clover fittings. A thread for a standard water heater element is at bottom and a thermowell
tube at top.
(www.brewershardware.com) This guy does beautiful work in stainless steel
*low-heat-density

![]() The heat element inside the RIMS tube is a large
low-heat-density stainless steel water heater element, rated 240VAC, but running
at 115 VAC to avoid scorching. After 3 batches, it's pristine with no scorching.
The heat element inside the RIMS tube is a large
low-heat-density stainless steel water heater element, rated 240VAC, but running
at 115 VAC to avoid scorching. After 3 batches, it's pristine with no scorching.
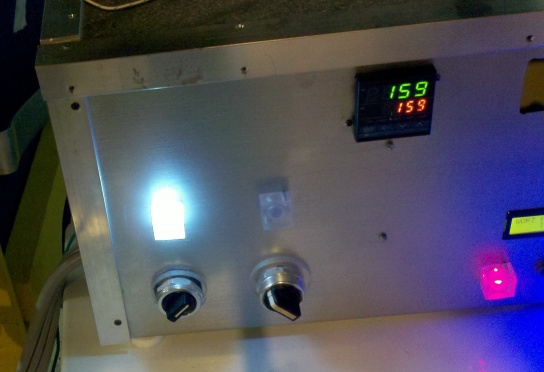
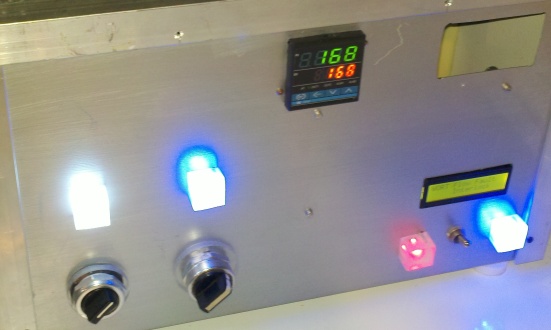
*RIMS controller face

![]() Switches, indicator lamps, PID controller, digital thermometer, and
Arduino and flow interlock and LCD display.
The pump must be ON and flow either detected or over-ridden before
current is allowed to pass to the heater.
(www.sureelectronics.net for the PID)
Switches, indicator lamps, PID controller, digital thermometer, and
Arduino and flow interlock and LCD display.
The pump must be ON and flow either detected or over-ridden before
current is allowed to pass to the heater.
(www.sureelectronics.net for the PID)
*RIMS controller inside
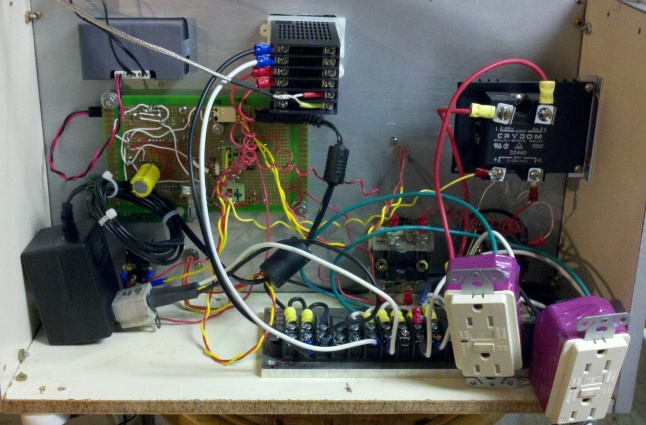
![]() Arduino circuit board at left showing connectors for hall-effect
flow sensor and interlock relays. PID controller at top center. Since this picture, I've replaced the
solid state relay with one on a larger heatsink. The Arduino program uses an interrupt
response routine to increment a counter. The background process waits 2 seconds then scales the pulse
count to liters per minute and updates the display and the flow interlock output.
Arduino circuit board at left showing connectors for hall-effect
flow sensor and interlock relays. PID controller at top center. Since this picture, I've replaced the
solid state relay with one on a larger heatsink. The Arduino program uses an interrupt
response routine to increment a counter. The background process waits 2 seconds then scales the pulse
count to liters per minute and updates the display and the flow interlock output.
*flow sensor

![]() 1/2" high-temperature hall-effect flow sensor gives roughly
80 pulses per second for 5 gallons per minute in this application.
The LCD display is programmed to display liters per minute.
(www.futurlec.com)
1/2" high-temperature hall-effect flow sensor gives roughly
80 pulses per second for 5 gallons per minute in this application.
The LCD display is programmed to display liters per minute.
(www.futurlec.com)
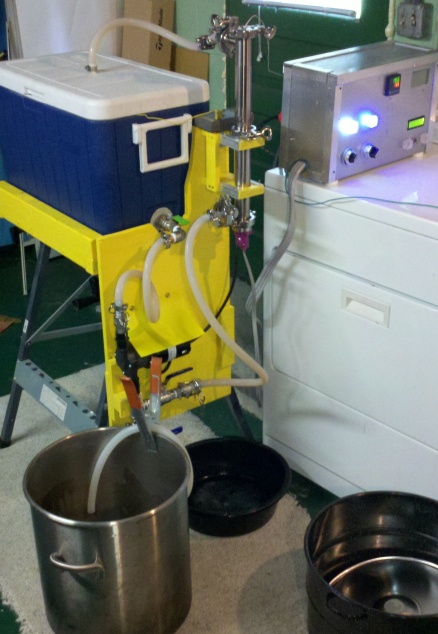
*assemble stand

![]() Portable hinged stand to hold the RIMS tube and water pump.
Portable hinged stand to hold the RIMS tube and water pump.
*connect tube stand brace
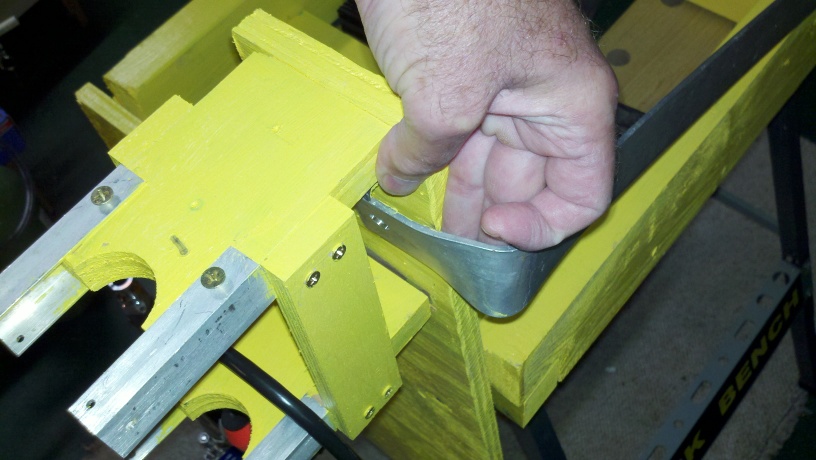
![]() Brace holds it square
Brace holds it square
*cooler to stand

![]() ...
...
*secure tube keepers
![]() ...
...
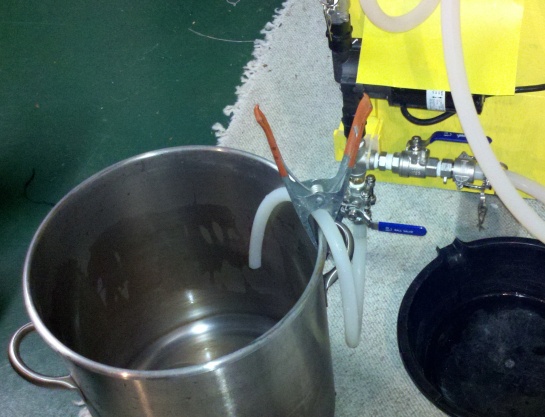
*attach QD hoses

![]() The stainless cam-lock Quick-Disconnect hose connectors are easy
to attach and don't leak. The silicone tubing handles high temperatures without stretching. Once the
cooler is filled, open bottom valve to flush air from the lines and prime the pump.
(www.bargainfittings.com)
The stainless cam-lock Quick-Disconnect hose connectors are easy
to attach and don't leak. The silicone tubing handles high temperatures without stretching. Once the
cooler is filled, open bottom valve to flush air from the lines and prime the pump.
(www.bargainfittings.com)
*March hs809 pump

![]() The motor and the food-grade pump housing are magnetically coupled.
This pump is rated at up to 7.5 gallons per minute at up to 121C.
I measure roughly 5GPM in this application with flow restrictions and 2 foot head.
(www.austinhomebrew.com}
The motor and the food-grade pump housing are magnetically coupled.
This pump is rated at up to 7.5 gallons per minute at up to 121C.
I measure roughly 5GPM in this application with flow restrictions and 2 foot head.
(www.austinhomebrew.com}
*ground clamp
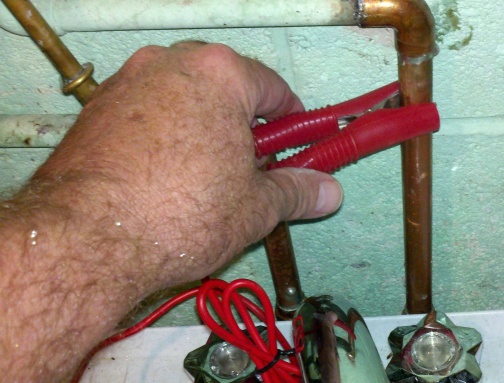
![]() Before attaching the pump or heater, tie the chassis to
water-pipe ground. The RIMS tube is grounded through a welded lug to the power cord then to earth ground.
Before attaching the pump or heater, tie the chassis to
water-pipe ground. The RIMS tube is grounded through a welded lug to the power cord then to earth ground.
*plug-in pump
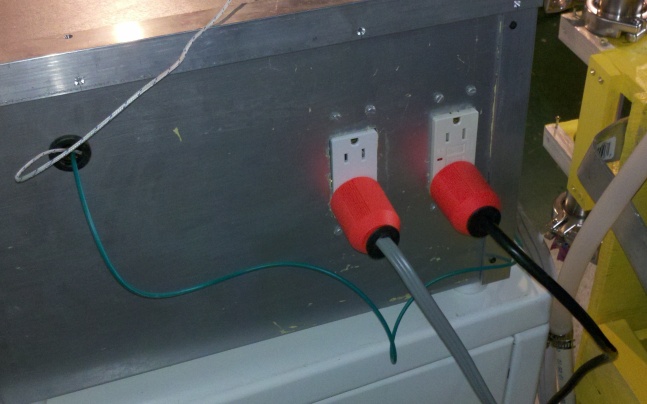
![]() The outlet at right is controlled by the pump switch. The left
outlet is controlled by the solid state relay, which passes current
when the PID controller gives it a 12 volt signal. This signal
only passes if the flow interlock circuit is driving the relay
The outlet at right is controlled by the pump switch. The left
outlet is controlled by the solid state relay, which passes current
when the PID controller gives it a 12 volt signal. This signal
only passes if the flow interlock circuit is driving the relay
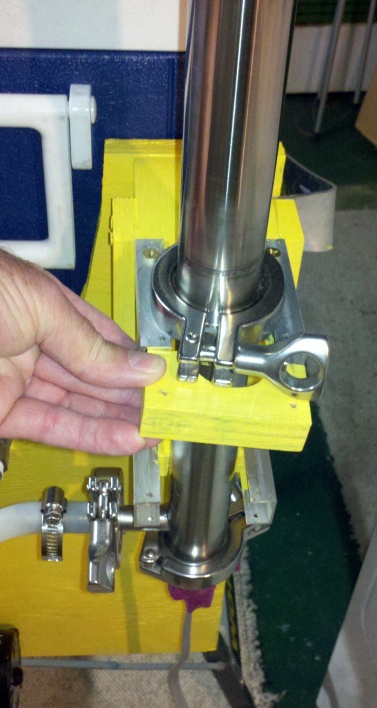
*probe into thermowell
![]() The type K thermocouple for the PID fits down the thermowell. An RTD
sensor might be more accurate, but this probe and controller
matches my reference thermometers within 1 degree F
The type K thermocouple for the PID fits down the thermowell. An RTD
sensor might be more accurate, but this probe and controller
matches my reference thermometers within 1 degree F
*arduino flow fault
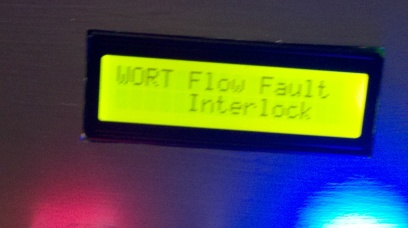
![]() An Arduino mini was programmed to count Hall-effect flow sensor
pulses, drive interlock and indicator relays, and display scaled flow
or alarm state on the LCD screen
An Arduino mini was programmed to count Hall-effect flow sensor
pulses, drive interlock and indicator relays, and display scaled flow
or alarm state on the LCD screen
*liters per minute
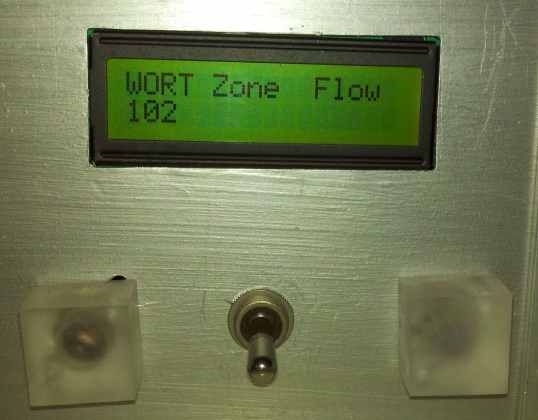
![]() The LCD displays flow in liters per minute. A four-tube copper
manifold in the bottom and a three-leg sparge arm in the top
of the cooler reduce flow very little.
The LCD displays flow in liters per minute. A four-tube copper
manifold in the bottom and a three-leg sparge arm in the top
of the cooler reduce flow very little.
***********************************
***** Brewing with RIMS ***********
***********************************
*dough-in temperature
![]() About 2 hours after setting the PID to dough-in temperature,
9.5 gallons of water are ready for the grist.
About 2 hours after setting the PID to dough-in temperature,
9.5 gallons of water are ready for the grist.
*mash-in
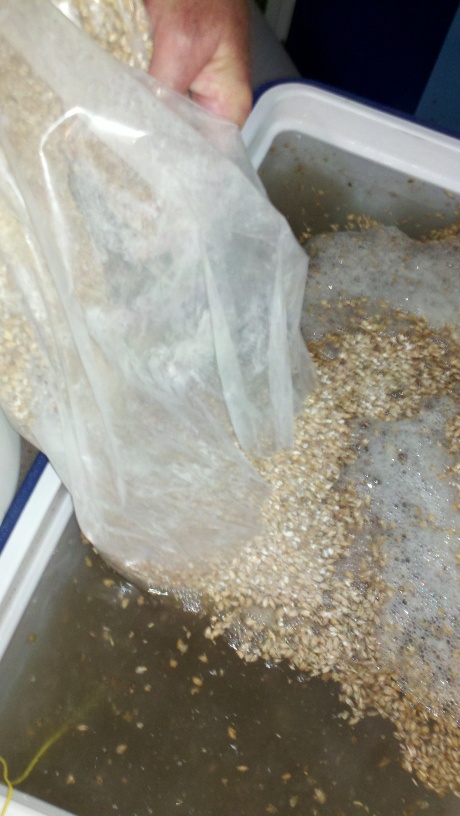
![]() After turning off the pump, add the grist and level the bed, then
connect the sparge manifold, start pump, and set PID to desired
mash temperature. Even with a 14 pound grist for no-sparge mashing, the flow rate through the
manifold is still nearly 100 liters per minute
After turning off the pump, add the grist and level the bed, then
connect the sparge manifold, start pump, and set PID to desired
mash temperature. Even with a 14 pound grist for no-sparge mashing, the flow rate through the
manifold is still nearly 100 liters per minute
*sparge manifold
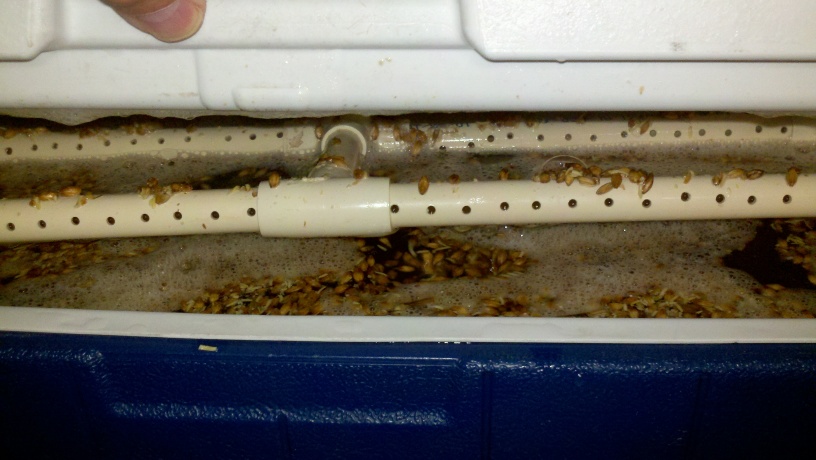
![]() With the large area of three drilled arms, this manifold gives
gentle flow to the top of the grain bed. Remaining underwater
at all times, there is no aeration of hot wort.
With the large area of three drilled arms, this manifold gives
gentle flow to the top of the grain bed. Remaining underwater
at all times, there is no aeration of hot wort.
*mashing
![]() The PID controller holds a very stable temperature. For a
mash-out, set the controller to 168. the ramp-up from mashing
temperature takes about ten minutes.
The PID controller holds a very stable temperature. For a
mash-out, set the controller to 168. the ramp-up from mashing
temperature takes about ten minutes.
*mash-out temperature
![]() ...
...
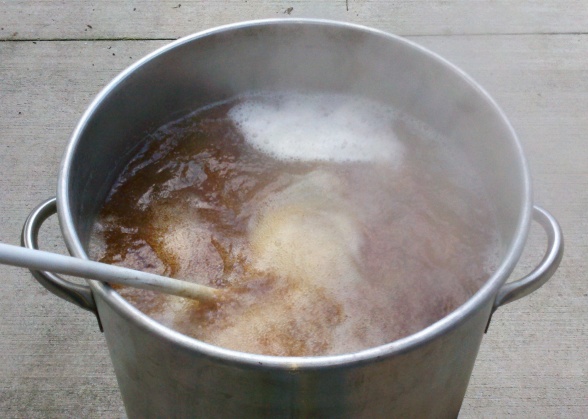
*drain to boiler
![]() With no-sparge mashing, the entire wort is drained at once.
For batch or classic sparging, additional water (heated elsewhere)
is added and drained through the grain bed to the boiler.
With no-sparge mashing, the entire wort is drained at once.
For batch or classic sparging, additional water (heated elsewhere)
is added and drained through the grain bed to the boiler.
*all-grain brew
![]() RIMS eliminates issues with mash temperature control.
Since you can boil in any weather, winter brewing is now possible.
RIMS eliminates issues with mash temperature control.
Since you can boil in any weather, winter brewing is now possible.